

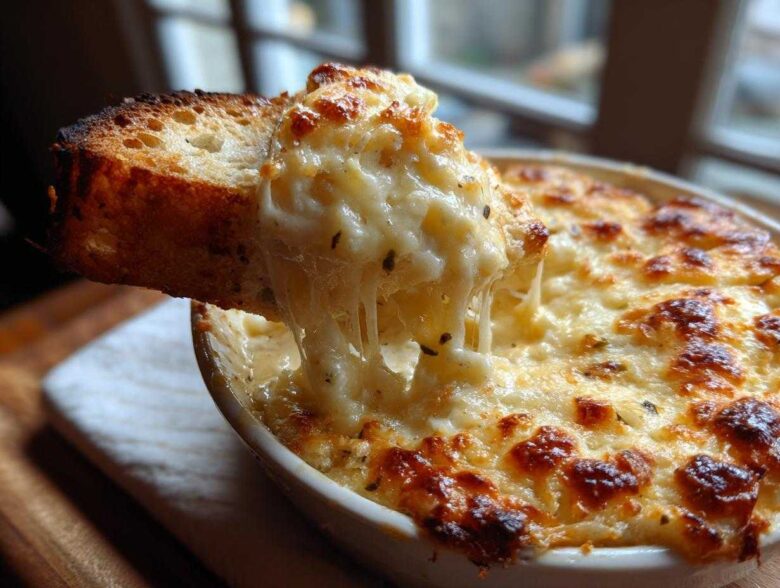
If you’re anything like me, when company comes over, you need an appetizer that hits all the right notes without demanding you stay chained to the stove. Forget fussy little canapés; we need something warm, comforting, and utterly cheesy! This is where my Cheesy Baked Garlic Bread Dip swoops in to save the day. Honestly, this flavorful dip is my go-to because it tastes like pure indulgence but takes only minutes to assemble. I perfected this version while trying to replicate that amazing, hot garlic bread experience we all love, but transformed into the ultimate shareable bread dip. It’s savory, it’s gooey, and trust me, it disappears fast. You’re going to love how simple this is!
Why This Cheesy Baked Garlic Bread Dip is Your New Favorite Appetizer Recipes
What makes this recipe a non-negotiable staple for my house? It’s the perfect trifecta: cheesy, garlicky, and served warm. If you need reliable party dips that always get rave reviews, stop searching right now. This recipe consistently proves itself to be one of the best crowd pleasing snacks I’ve ever made.
- It features loads of melted, stringy mozzarella mixed with sharp Parmesan, making it infinitely better than single-cheese dips.
- These warm appetizers deliver that intense roasted garlic flavor without any of the fuss of chopping raw cloves.
- It’s one of the most easy dips you’ll ever throw together—seriously, mix and bake!
Quick Prep Time for This Easy Dips Recipe
I love that I can usually have this mixed up in 10 minutes flat. If you’re scrambling last minute, this is your hero. The oven does all the hard work while you focus on setting out the bread and grabbing drinks. It’s nearly instant gratification!
The Ultimate Flavor Profile of Our Bread Dip
When you pull this bread dip out of the oven, the smell alone is worth the effort. That creamy base of softened cream cheese and sour cream melts right into the mozzarella, creating that incredible texture we all chase. The roasted garlic melts seamlessly into the cheese, giving every spoonful a deep, savory warmth that just sings.

Essential Ingredients for the Best Cheesy Bread Dip
When making a top-tier cheese spread like this, you really can’t skimp on the dairy. The quality of your cheese dictates the texture of this entire creamy dip. I always try to shred my mozzarella myself because the pre-shredded bags are coated in anti-caking agents that can make the final product a little grainy. I keep my ingredients list super straightforward!
- 8 ounces cream cheese, make sure this is completely softened—it’s crucial for a smooth mix!
- 1 cup shredded mozzarella cheese (see my note above—freshly shredded is best!)
- 1/2 cup grated Parmesan cheese (the good stuff, mind you!)
- 1/4 cup sour cream (this adds just a little tang, don’t skip it)
- 4 cloves garlic, roasted and mashed until it’s almost paste-like
- 1 teaspoon dried Italian seasoning
- 1/2 teaspoon garlic powder
- 1/4 teaspoon black pepper
- 1/4 cup grated Parmesan cheese, reserved specifically for topping
If you want to check out my general rules on sourcing ingredients and ingredient swaps, I put a quick guide up over on my recipe disclaimer page. Getting these building blocks right means you’re halfway to the best appetizer ever!
Expert Tips for Perfecting Your Garlic Dip
Listen, this isn’t just throwing things in a bowl; there’s a real technique to getting this bread dip perfectly smooth and intensely flavorful. Building up that flavor profile really makes the difference between a good appetizer and the BEST appetizer. It all comes down to prepping your main components correctly before they even see the baking dish.
Achieving Creamy Dips: Handling the Cream Cheese
The absolute biggest mistake people make when starting any great cheese spread is using cream cheese that’s too cold! If it’s stiff, you’ll end up with little lumps of unmixed cheese even after you think you’ve stirred enough. I always pull mine out at least an hour before mixing. If you’re in a rush, carefully microwave the block for about 10 seconds—but seriously, just let it sit out! It should yield easily to the touch.
Making the Roasted Garlic for Your Bread Dip
Roasting the garlic takes an extra 40 minutes, but trust me, it’s non-negotiable for this recipe. You wrap the whole head in foil with a bit of olive oil and bake it around 400°F until it’s meltingly soft. Once it’s cool enough to handle, you just squeeze the gorgeous, sweet cloves right out. This mellows the sharpness completely and makes the best flavor in this bread dip! I always roast two heads at once because I use the leftovers in soups all week long.
Step-by-Step Instructions for This Warm Appetizers Bread Dip
Okay, now for the fun part—assembling this cheesy dream! Honestly, if you can stir ingredients together, you can master this recipe. The order really matters here, though, so follow along closely so you get that perfect, bubbly top and creamy interior for your bread dip.
- First things first, get that oven warmed up! Preheat your oven to 375 degrees Fahrenheit. While it’s heating, grab a small, oven-safe baking dish—mine is about 6×8 inches—and give it a very light greasing. You don’t want it swimming in oil, just lightly coated.
- In a roomy bowl, combine the heavy hitters: the softened cream cheese, your mozzarella, half of your Parmesan (save that other 1/4 cup for the top!), the sour cream, all of that luscious roasted garlic, the Italian seasoning, garlic powder, and pepper. My tip is to use a sturdy rubber spatula here, not an electric mixer. We are combining, not whipping! Mix everything until it looks totally homogenous—no white streaks of cream cheese hiding anywhere.
- Scrape that glorious mixture evenly into your prepared dish. Make sure the top is reasonably level; it helps everything bake evenly.
- Now, sprinkle the remaining 1/4 cup of Parmesan cheese right over the surface. This is what’s going to give you those little crunchy, golden spots.
- Pop it into the preheated oven and let it bake for about 20 to 25 minutes. You’re looking for it to be piping hot all the way through, and the top should have developed a nice light brown color.
Once it’s out, let it sit on the counter for just five minutes before diving in. It’s molten hot! I always serve this with the crusty sliced baguette I kept soaking in olive oil earlier. You can find my quick guide on pairing appetizers over on my About Us page if you need dipping inspiration!
Serving Suggestions for This Flavorful Dips Recipe
You’ve got this amazing, hot, gooey cheese situation ready to go—now we have to talk about what to actually dip into it! Presentation matters, especially when you’re pulling this out for game day snacks or a big gathering. You want things that can really handle the weight of this substantial dip.
My hands-down favorite pairing is a crusty French baguette. I slice it, brush it lightly with olive oil, and toast it in the oven for about five minutes until the edges are crisp but the inside is still chewy. That contrast against the creamy, savory dip is just heaven.
The Best Bread Choices
Don’t settle for sad, floppy bread when you have such a fantastic dip! If a baguette isn’t available, definitely grab a dense sourdough loaf. You need that sturdy structure to scoop up a good portion of the cheese without breaking off inside the dish. Another great option is thick-cut pita bread—you can even crisp it up slightly beforehand for extra crunch.
Veggies That Hold Up to the Heat
If you need a lighter or vegetable-based dipper, you have to choose sturdy options. Think about things that won’t wilt under the heat of the dip. I love arranging colorful bell pepper strips (red and yellow look so nice!) around the baking dish. Celery sticks are great because they offer that satisfying snap. Broccoli or cauliflower florets, lightly blanched just to take the raw edge off, also hold up wonderfully.
Making It a Party Appetizer Spread
If you’re building out a whole spread of party appetizers, place this hot dip right in the center. Flank it with your carbs on one side and veggies on the other. I also like to scatter some fresh herbs over the top right before serving—a little sprinkle of chopped parsley or chives adds a pop of green color that makes the whole presentation look professional. Everyone grabs this first, I promise!
Storage and Reheating Instructions for Your Cheese Spreads
Okay, let’s talk about the inevitable—leftovers! This dip is so good that sometimes we actually have some remaining, which is a testament to how delicious it is. The great news is that these cheese spreads store really well, which means you get to enjoy that cheesy goodness again the next day!
When you have leftovers, try to get them into an airtight container or cover the baking dish tightly with plastic wrap or foil while the dip is still slightly warm, but not piping hot. Once cooled completely, pop it into the refrigerator. It will firm up considerably once chilled—that’s just the nature of cream cheese and mozzarella sitting in the cold!
The Best Way to Reheat Your Leftover Dip
I strongly prefer reheating this in the oven because it helps those fats and cheeses melt back together beautifully, giving you a texture much closer to when it was freshly baked. You’ll want to transfer any leftover dip from storage containers back into an oven-safe dish if needed. Cover it loosely with foil first to prevent the top from browning too quickly.
Bake it at about 325°F until it’s heated all the way through. This usually takes between 15 and 20 minutes, depending on how much you have left. You might notice the texture seems just a tiny bit grainy compared to the first time—that’s normal for baked dips after refrigeration. You can stir in a teaspoon or two of sour cream or milk right before reheating if it seems stiff.
Quick Microwave Reheating
If you are craving just a single serving and need it immediately, the microwave is your friend, but you have to be gentle! Microwave it in short bursts—say, 20 seconds at a time—stirring vigorously between each interval. Microwaving on high power for too long will cause the cheese to seize up and potentially break, making it oily or rubbery. Short, patient bursts are the secret to salvaging this dip quickly!
Troubleshooting Common Issues with Baked Dips
Even the simplest baked dips can throw you a curveball sometimes. Don’t worry if yours doesn’t come out looking identical to the pictures! I’ve messed up enough batches of this bread dip over the years to learn a few tricks for fixing common kitchen oopsies, which I’m happy to pass along so you don’t have to stress.
The most common issue I see is that the dip doesn’t get hot enough in the middle, or sometimes the edges look crusty while the center is still pulling apart. That usually means your baking dish was too large or too shallow for the amount of dip you made.
Fixing a Dip That Won’t Melt Evenly
If you find your cheeses aren’t melting together smoothly—maybe the mozzarella is separating from the cream cheese base—it almost always comes back to temperature. This usually happens if your cream cheese and sour cream were still too cold when you mixed everything. For a quick fix on a baked dip that’s already done, take it out, stir vigorously right in the dish, and pop it back into the oven for maybe five more minutes on a slightly lower heat setting. A tiny splash of milk when stirring can sometimes help rescue separation too.
What If My Bread Dip Looks Too Dry?
If your dip sets up way too stiff or dry when it comes out, don’t panic! Dryness usually means you either didn’t use enough soft dairy (like sour cream) or you accidentally used low-fat cheese. Before reheating, gently stir in a spoonful of heavy cream or even a little more sour cream right into the center. Cover it tightly with foil and let it sit on the warm stove burner for about ten minutes off the heat. The steam trapped under the foil will gently reintroduce moisture, reviving that creamy texture our favorite bread dip needs!
Frequently Asked Questions About Our Bread Dip
I get so many messages whenever I post this recipe because everyone wants to make sure their appetizer game is strong! Here are the biggest questions I run into when people are getting ready to serve up this cheesy goodness. It’s so easy to customize, but a few key things really make this the best choice for game day snacks.
Can I make this bread dip ahead of time?
Yes, you absolutely can! This is a huge win for anyone hosting a larger party. You can mix the entire dip—everything except the final dusting of Parmesan—up to a full day in advance. Just cover it tightly and keep it in the fridge. When your guests arrive, just take it out about 30 minutes before you want to bake it so it’s not ice cold, and then proceed with the baking instructions. It comes out just as bubbly and perfect!
What is a good substitute for mozzarella in this cheesy dip?
While I adore the melt of mozzarella, if you need a substitute for this cheesy dip, I’d highly recommend Monterey Jack. It melts beautifully and has a very similar mild flavor profile, so it won’t overpower that amazing roasted garlic. Just use a 1-to-1 ratio swap. If you prefer something with a little more sharpness, Pepper Jack works wonders for a spicy twist!
Can the roasted garlic be swapped for plain garlic powder?
I know the roasting step seems like extra work when you’re looking for simple appetizers, but please don’t skip it for this specific bread dip! Plain garlic powder won’t give you that sweet, mellow, spreadable intensity we’re looking for. If you *absolutely* cannot roast garlic, use the powder plus a teaspoon of garlic infused olive oil mixed in with the cream cheese, but trust me, the texture and depth of flavor from the roasted cloves are what make this recipe special.
Are there other bread dip variations I can try?
Oh, without a doubt! While this recipe focuses on a rich, creamy dip, if you’re looking for oil-based options, I have a fantastic Italian restaurant style dipping oil recipe you should check out next time you have crusty bread. That uses olive oil, balsamic, and herbs—a totally different experience, but equally wonderful for an appetizer spread!
Nutritional Estimates for This Appetizer
Okay, let’s talk numbers for a moment. While I’m focused on making the most decadent, delicious warm appetizers here, I know some of you are curious about what’s in every scoop! Please remember that these figures are calculated estimates based on the standard ingredients listed, and they can change slightly depending on the brands of cheese or the exact amount of oil that soaks into your bread dippers.
Because this is such a rich, dairy-focused dish, it definitely leans higher in fat, but it also packs a solid punch of protein thanks to all that cheese, making it satisfying. I always see these kinds of recipes as an occasional treat rather than an everyday snack!
For context, here’s a breakdown for one serving (which is about 1/6th of the dip, not counting the bread you scoop it with):
- Serving Size: 1/6 of dip
- Calories: About 210
- Fat: Around 18g (Keep in mind 10g of that is saturated fat from the cheese, which is normal for a rich baked dip.)
- Protein: A great boost at around 9g
- Carbohydrates: Very low, only about 3g
- Sugar: Minimal, just 2g
- Sodium: Approximately 350mg (This is the one to watch, as salt content is high in processed cheeses.)
- Cholesterol: 50mg
Just a little reminder that all the ingredient ratios and nutritional facts are based on the recipe components listed above—if you swap specialty cheeses or add extra sour cream, the profile shifts! If you want to read more about how I approach providing this type of dietary information on my site, you can always check out my privacy policy page. Enjoy these indulgent party dips responsibly!
PrintCheesy Baked Garlic Bread Dip

A warm, creamy, and cheesy dip flavored with roasted garlic and Italian herbs, perfect for serving with crusty bread.
- Prep Time: 10 min
- Cook Time: 25 min
- Total Time: 35 min
- Yield: 6 servings
- Category: Appetizer
- Method: Baking
- Cuisine: American
- Diet: Vegetarian
Ingredients
- 8 ounces cream cheese, softened
- 1 cup shredded mozzarella cheese
- 1/2 cup grated Parmesan cheese
- 1/4 cup sour cream
- 4 cloves garlic, roasted and mashed
- 1 teaspoon dried Italian seasoning
- 1/2 teaspoon garlic powder
- 1/4 teaspoon black pepper
- 1/4 cup grated Parmesan cheese, for topping
Instructions
- Preheat your oven to 375 degrees Fahrenheit. Lightly grease a small oven-safe baking dish.
- In a medium bowl, combine the softened cream cheese, mozzarella cheese, 1/2 cup Parmesan cheese, sour cream, roasted garlic, Italian seasoning, garlic powder, and black pepper. Mix until all ingredients are fully incorporated and smooth.
- Spread the mixture evenly into the prepared baking dish.
- Sprinkle the remaining 1/4 cup of Parmesan cheese over the top of the dip.
- Bake for 20 to 25 minutes, or until the dip is hot throughout and the top is lightly golden brown.
- Serve immediately with sliced baguette or breadsticks.
Notes
- Roast garlic by wrapping whole heads in foil with a drizzle of olive oil and baking at 400 degrees Fahrenheit for 30 to 40 minutes until soft.
- You can prepare the dip mixture up to one day ahead and store it covered in the refrigerator before baking.
- For extra flavor, stir in 2 tablespoons of finely chopped fresh parsley before baking.
Nutrition
- Serving Size: 1/6 of dip
- Calories: 210
- Sugar: 2
- Sodium: 350
- Fat: 18
- Saturated Fat: 10
- Unsaturated Fat: 8
- Trans Fat: 0.5
- Carbohydrates: 3
- Fiber: 0
- Protein: 9
- Cholesterol: 50