

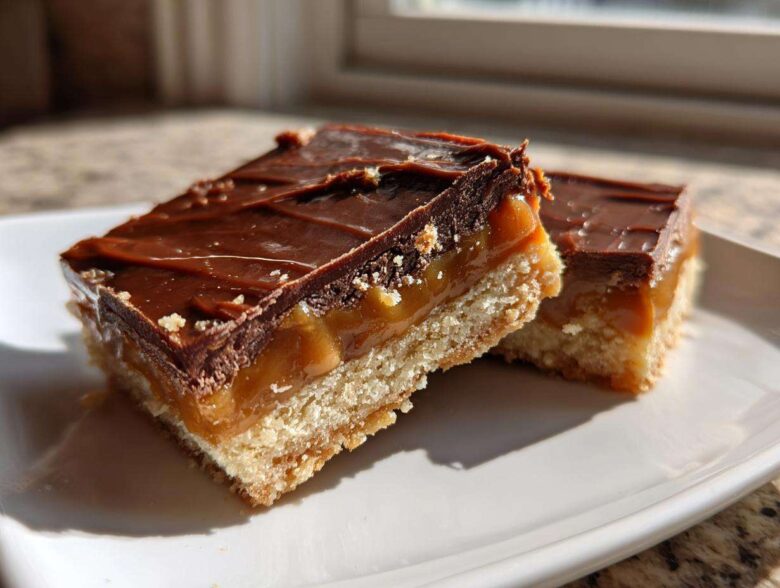
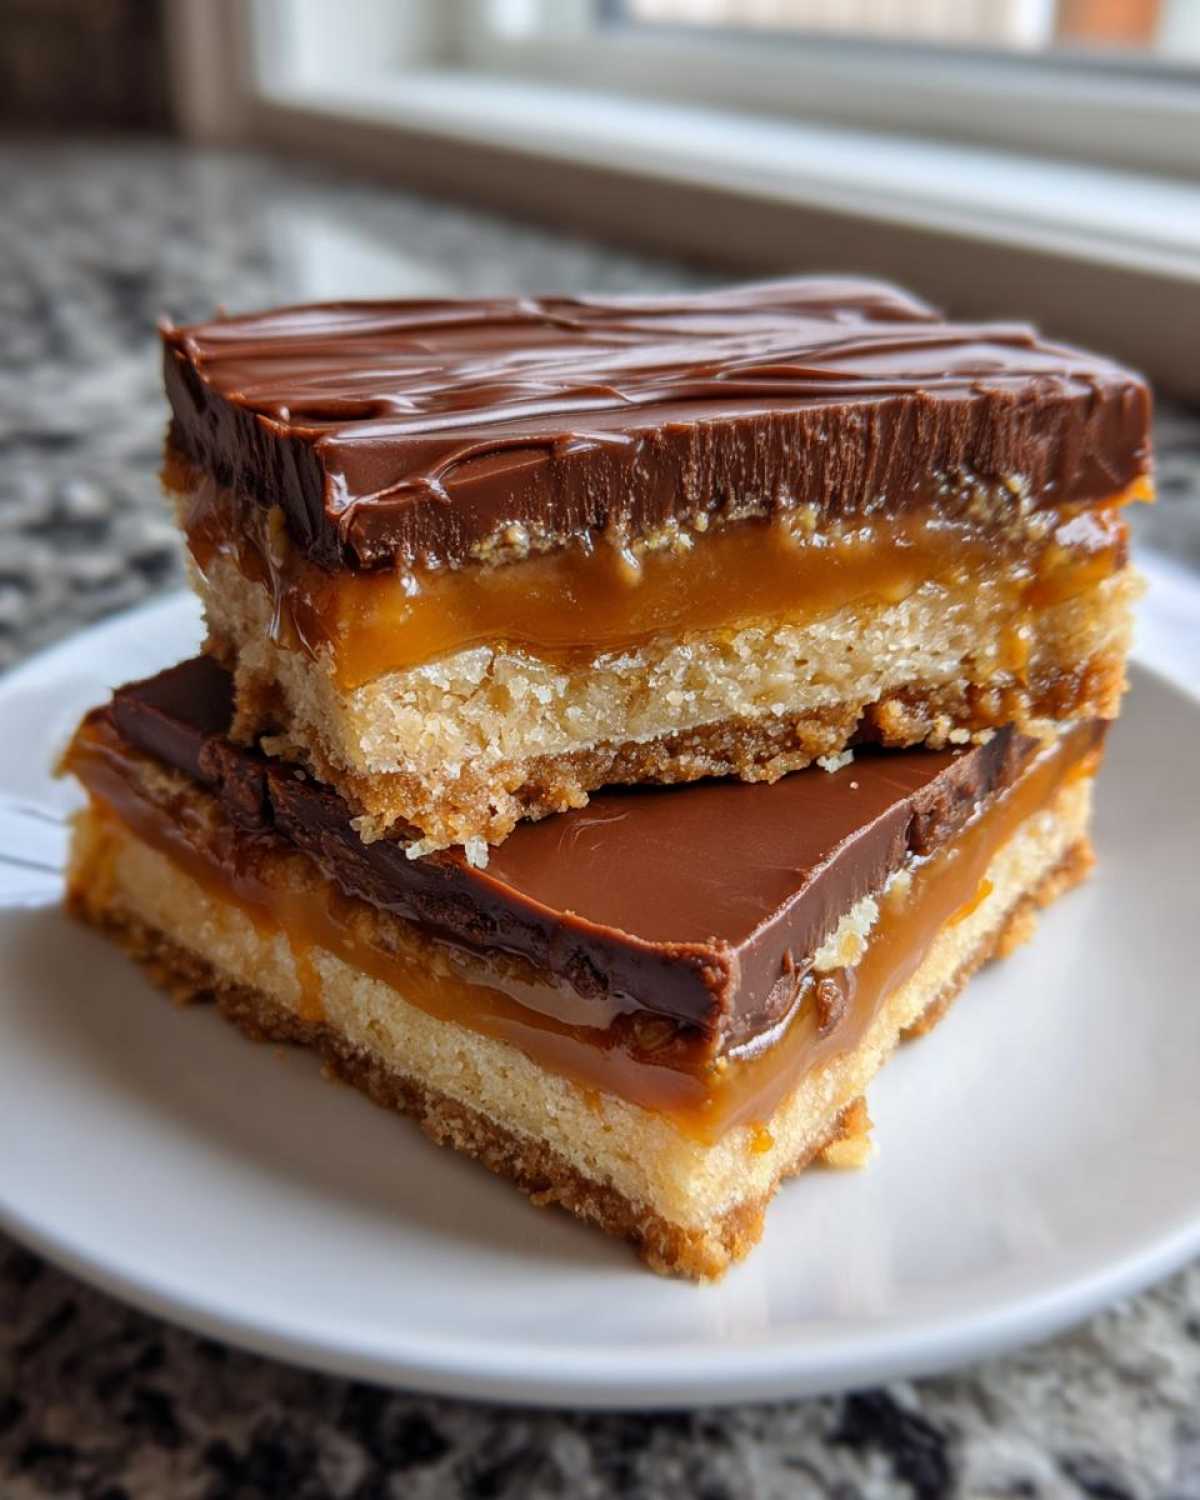
Okay, you know how sometimes you just *need* that specific crunch and ooey-gooey texture of your favorite candy bar right now? Well, stop driving to the vending machine! I am genuinely thrilled to share this recipe because making your own homemade Twix Cookie Bars isn’t just baking; it’s total kitchen magic. Forget those sad, chalky store-bought imitations. We’re stacking buttery shortbread, perfectly gooey caramel, and a thick chocolate shell that makes you forget all about the originals.
This is, without a doubt, the ultimate guide for achieving that iconic flavor profile right in your own oven. Trust me when I say that the first time you slice through that firm, cool chocolate layer and hit that buttery base, you’ll never go back. It’s so incredibly satisfying! You can find more about my baking philosophy over at our story, but for now, let’s get these amazing Twix bars started!
Why You Will Love This Homemade Twix Recipe
I know, I know. You see a candy bar recipe and think, “Too complicated.” But seriously, this one is a winner, and I wouldn’t share it if it wasn’t worth the effort. You’re going to crave these far more than the originals!
- This recipe delivers the ultimate texture contrast: crisp, firm chocolate giving way to a gooey caramel dessert center.
- The shortbread base is incredibly buttery shortbread dessert perfection—it crumbles just right without falling apart.
- It’s much simpler than you think! If you can make a shortbread crust, you can master this Homemade Twix Recipe in one afternoon.
- The caramel layer is thick and luxurious, nothing like those thin, sad layers you find in the store-bought kind. It’s pure decadence!
- You get to control the chocolate quality—use your favorite brand for that perfect snap when you bite in.
- It’s easily adaptable into smaller, Bite Sized Twix pieces, making them perfect for holiday candy platters or quick snacking.
Honestly, the combination of that melt-in-your-mouth crust and the chewy caramel seals the deal every single time. It’s truly one of the Best Cookie Bar Recipes out there!
Essential Ingredients for Perfect Twix Cookie Bars
Okay, listen up! Getting the texture right in these Copycat Twix bars depends entirely on treating these simple ingredients right. We need structure for the base, unbelievable chewiness for the middle, and a glossy finish on top. I’ve broken down what you need into three key components. Remember that precision in measuring is what turns these into incredible Chocolate Caramel Treats instead of just… well, a mess!
For the Buttery Shortbread Base
The crust is the anchor for everything else. You absolutely *must* use real butter here; don’t even think about that wrapper margarine! That high-quality butter is what gives us that perfect, slightly crumbly, yet sturdy base that holds up to the caramel later on.
- 1 cup (2 sticks) unsalted butter, it needs to be truly softened—leave it out for at least an hour!
- 1/2 cup granulated sugar
- 2 cups all-purpose flour
- 1/4 teaspoon salt (to cut through the sweetness)
Creating the Thick Caramel Layer
Getting that luscious, chewy middle is the hardest part, but it’s easy if you follow the timing! We are dedicated to achieving that beautifully Thick Caramel Layer. The sweetened condensed milk is non-negotiable; it’s what gives us that perfect sticky texture when cooked just right.
- 1 (14 ounce) can sweetened condensed milk
- 1/2 cup packed light brown sugar (packing it makes a huge difference!)
- 1/2 cup (1 stick) unsalted butter
- 1 teaspoon pure vanilla extract
The Chocolate Caramel Treats Topping
This is the finishing touch that lets you pick up the bar without getting sticky fingers (until you bite into it, anyway!). We use chocolate chips because they melt beautifully, and a tiny bit of oil ensures the coating dries smooth and shiny.
- 1 1/2 cups semi-sweet chocolate chips (use good quality!)
- 1 tablespoon vegetable oil (this keeps the chocolate pourable and prevents it from seizing up too stiffly)
Step-by-Step Instructions for Your Copycat Twix
Alright, here’s where the magic truly happens! I’ve tried every shortcut under the sun, but following these steps in order is the secret to getting that perfect, non-soggy foundation and richly chewy middle. Don’t rush the cooling stages; that’s what separates a good bar from one that oozes everywhere when you try to cut it! Grab your 9×13 pan, line it with parchment paper letting the sides hang over the edge—that overhang is our lifting handle later!
Baking the Shortbread Base
First things first: preheat that oven to 350°F (175°C). Now, back in the mixing bowl, we need to cream that softened butter and granulated sugar together until it looks pale and fluffy—this is the aeration step! Once that looks good, slowly add the flour and salt. You’ll mix this until it just comes together, looking a bit sandy. Press that dough firmly and evenly into the bottom of your lined pan. We’re only baking this until the edges are just turning a faint gold, about 15 to 18 minutes. Pull it out; it needs to be warm for the caramel!
Making and Setting the Gooey Caramel Layer
While the crust is warm, let’s get the caramel going on the stovetop. Combine your condensed milk, brown sugar, and the extra butter in a saucepan. Bring that mixture to a boil over medium heat, stirring constantly so it doesn’t burn the bottom! Once it’s boiling, drop the heat low and keep stirring for about five minutes until it thickens up nicely. Watch it closely here—if you cook it too long, you get hard candy, not that perfect gooey caramel we want! Take it off the heat, stir in the vanilla, and immediately pour that hot caramel evenly over the warm shortbread base. Pop the whole pan back into the oven for just 10 more minutes. Now comes the hard part: let it cool on the counter for an hour, then move it to the fridge for at least one more full hour until that caramel is completely set.
These terms are important for understanding product usage, so keep them in mind!
Finishing with Chocolate Covered Caramel
For the final layer, we need chocolate that spreads like silk. Put your chocolate chips and vegetable oil in a microwave-safe bowl. Microwave in short, 30-second bursts, stirring well in between each burst, until it’s totally smooth. Don’t try to rush this heating step, or the chocolate might seize up! As soon as it’s ready, pour it over that firm, chilled caramel layer and spread it quickly to cover everything evenly. Back into the fridge it goes for at least two hours until that chocolate layer is completely firm. Once it’s set solid, use those parchment paper handles to lift the whole slab out and slice it into bars. Easy peasy!
Tips for Success with this Twix Style Cookies Recipe
Even though this Twix Style Cookies recipe is pretty straightforward, a few little tricks can take your bars from great to absolutely legendary. I learned these the hard way, so you don’t have to! The goal here is perfect layers that cooperate when you cut them, which means managing temperature and timing is everything, especially with that caramel.
For the shortbread base, make sure you press it down firmly and evenly into the pan. If one side is thin and the other is thick, one part will burn while the other stays raw—and nobody wants a lopsided base for their Decadent Candy Bar Dessert! Use the bottom of a liquid measuring cup to get a nice, flat surface before it goes into the oven.
When you are cooking the caramel, you absolutely must stir it constantly. I mean it! If you step away even for 30 seconds to grab a spoon, that brown sugar can scorch, and burnt sugar tastes bitter against all that lovely, buttery shortbread. You’re done cooking it when it coats the back of your spoon easily and looks slightly darker, but definitely not dark brown.
The chilling steps are not suggestions; they are mandatory steps for success! You need that caramel firm before you pour the chocolate on top. If you try to pour melted chocolate over warm or soft caramel, they mix together, and you end up with a chocolatey caramel blob instead of distinct layers. If you are impatient (and I sometimes am!), pop the pan into the freezer for 20 minutes after the hour of fridge chilling—that really firms things up for the ultimate clean slice.
Finally, when cutting, use a large, very sharp knife. Heat the knife under hot water for ten seconds, wipe it immediately dry, and then press straight down. Wipe the blade clean between each cut. This trick, especially when dealing with the cold chocolate, ensures you get those beautiful, sharp squares you see in magazines rather than jagged edges.
Ingredient Notes and Substitutions for Your twix Bars
I get so many questions about tweaking this recipe, especially because everyone wants to sneak in some healthier options or just run out of one specific item! While I am a huge believer in sticking to the original formula for the best Copycat Twix flavor, there are a few swaps you can make without totally ruining the experience. Just know that if you stray too far, you might lose that perfect candy bar snap!
First off, let’s talk about trying to make a healthier version, maybe aiming for a Refined Sugar Free Twix experience. That’s tough because the foundation of the flavor is literally butter, sugar, and condensed milk! You *could* try swapping the granulated sugar in the crust for an erythritol blend or coconut sugar, but condensed milk is the real hurdle there—it’s rare to find a direct keto/sugar-free substitute that cooks down into that perfect caramel consistency. For now, I keep this recipe as an occasional splurge!
If you are in a pinch on the stovetop, remember that the vegetable oil in the topping is purely for smoothness. If you don’t have vegetable oil, you can use coconut oil if it’s melted, or even a neutral-flavored shortening. You just need that little bit of extra fat to keep the chocolate from becoming too thick and hard once it cools down. Don’t skip it, or your chocolate topping will crack into a million pieces when you try to cut these Chocolate Caramel Treats!
Now, about the flour—I rarely bake these gluten-free, but if you wanted to try a Gluten Free Twix Bars attempt, I’d suggest using a high-quality 1-to-1 gluten-free flour blend in the shortbread base. Keep the amount the same, but you might need to press that dough even more firmly into the pan since GF flours don’t always bind the same way. Let me know if you try it! You can always read my general disclaimer here if you have specific allergy concerns.
Finally, the butter! I’ve mentioned it before, but please, stick to unsalted butter for both the crust and the caramel. Unsalted lets you control the salt content perfectly. If you only have salted butter on hand, skip adding that extra 1/4 teaspoon of salt to the shortbread mix, and just use 1/8 teaspoon in the caramel, just to be safe. It’s all about balancing that rich, buttery flavor!
Storage and Reheating Instructions for Decadent Candy Bar Dessert
Because these Decadent Candy Bar Dessert bars have that amazing, thick caramel layer, keeping them cool is the secret to long-term happiness. Store leftovers in an airtight container in the refrigerator. Honestly, they taste best when served cold, right from the fridge because that lets the chocolate have that satisfying snap!
They hold up really well for about a week stored this way. If you want them *slightly* softer to really get that gooey caramel experience, just let them sit on the counter for about 15 minutes before serving. Don’t bother trying to microwave them, though—that caramel gets too messy, too fast!
Frequently Asked Questions About Making twix
I totally understand! Baking something inspired by a classic candy bar can bring up a few questions. You want that perfect result, and sometimes a little troubleshooting is all it takes. Here are some things I hear all the time when people are trying to nail these sweet treats!
Can I make this a ‘No Bake Twix Recipe’?
That’s a great question, especially when summer hits and we want to keep the oven off! Unfortunately, this particular recipe relies heavily on baking the shortbread crust for structure and then baking the caramel briefly to set it perfectly. Trying to make this a No Bake Twix Recipe usually means substituting the crust with graham crackers or crushed cookies, and those don’t have that same satisfying, buttery snap as the baked shortbread. If you’re looking for truly no-bake, I generally suggest looking for recipes based on puffed rice cereal or rice krispies for the base, but for this specific texture, you need the oven!
How do I get the caramel layer really soft and gooey?
Ah, the quest for ultimate goo! The key to keeping the caramel soft really comes down to the cooking time. When you are stirring the mixture on the stovetop after it boils—that five-minute window is crucial. You want it to thicken up enough to coat the back of your spoon but stop *before* it starts pulling away from the sides of the pan significantly. Overcooking it is what makes it hard later. Also, remember that chilling time! If you chill it long enough, the caramel becomes perfectly chewy, not rock hard. If you want it extra soft, definitely let the finished bars sit out for 15 minutes before cutting them, as mentioned in the storage tips.
Can I freeze these bars?
Yes, you absolutely can freeze these Chocolate Caramel Treats! They handle freezing surprisingly well because of that stable shortbread base. Once you have cut the bars (or bites!), place them in a single layer on a baking sheet lined with parchment paper and freeze them solid for about two hours. Once firm, transfer them to a heavy-duty freezer bag or airtight container. They keep beautifully for up to three months. When you want one, just thaw them in the fridge overnight, or let them sit on the counter for about 30 minutes before diving in. They are fantastic slightly frozen, too, if you like that extra crack in your chocolate!
Which chocolate works best for making Bite Sized Twix?
For the best chocolate coating that has a nice snap but doesn’t crack too much when you bite into it, you want a decent amount of fat content. I stick to the semi-sweet chips mixed with a tiny bit of oil, as written. If you want something richer, use dark chocolate chips. If you want something sweeter that melts softer, use milk chocolate chips. Just make sure whatever you choose, you use that little bit of oil or maybe a teaspoon of coconut oil to keep the final layer smooth and easy to spread over the chilled caramel before it sets up.
If you have any other burning questions about your Homemade Twix Recipe, feel free to reach out; you can find all my contact details over at my contact page!
Estimated Nutritional Data for this twix Cookie Bars Recipe
When we talk about Decadent Candy Bar Dessert, we aren’t aiming for a salad replacement, right? But I always like to give you a rough idea of what’s in these amazing bars so you can plan accordingly. Remember, these estimates are based on the recipe yielding 24 servings cut into bars. Your actual numbers might vary slightly depending on the exact brand of butter or chocolate you use, but this should give you a very close picture!
- Serving Size: 1 bar
- Calories: 280
- Fat: 17g (with 10g saturated)
- Carbohydrates: 30g
- Sugar: 25g (Yes, that’s where the fun is!)
- Protein: 3g
- Sodium: 85mg
It’s a treat, for sure, but every single calorie is worth it when you taste that buttery shortbread underneath all that caramel goodness. You can read a bit more about how these figures are derived on my cookie policy page, just so you know where the data comes from.
Share Your Homemade twix Creations
I seriously cannot wait for you to try these! Making your own version of this candy bar staple is such a rewarding experience, and seeing your successes makes my day. Once you’ve cooled, cut, and devoured your first batch of these incredible twix Cookie Bars, please come back here and let me know how they turned out.
Did you manage that super thick caramel layer? Did the chocolate set perfectly? Leave a star rating right below the recipe card and drop all your thoughts in the comments. Seriously, I read every single one! Tag me on social media if you post photos of your layers—I love seeing how they turn out in different kitchens. Happy baking, and enjoy your slice of homemade candy heaven! Don’t forget to check out my official privacy policy for details on site usage.
Estimated Nutritional Data for this twix Cookie Bars Recipe
When we talk about Decadent Candy Bar Dessert, we aren’t aiming for a salad replacement, right? But I always like to give you a rough idea of what’s in these amazing bars so you can plan accordingly. Remember, these estimates are based on the recipe yielding 24 servings cut into bars. Your actual numbers might vary slightly depending on the exact brand of butter or chocolate you use, but this should give you a very close picture!
- Serving Size: 1 bar
- Calories: 280
- Fat: 17g (with 10g saturated)
- Carbohydrates: 30g
- Sugar: 25g (Yes, that’s where the fun is!)
- Protein: 3g
- Sodium: 85mg
It’s a treat, for sure, but every single calorie is worth it when you taste that buttery shortbread underneath all that caramel goodness. You can read a bit more about how these figures are derived on my cookie policy page, just so you know where the data comes from.
Share Your Homemade twix Creations
I seriously cannot wait for you to try these! Making your own version of this candy bar staple is such a rewarding experience, and seeing your successes makes my day. Once you’ve cooled, cut, and devoured your first batch of these incredible twix Cookie Bars, please come back here and let me know how they turned out.
Did you manage that super thick caramel layer? Did the chocolate set perfectly? Leave a star rating right below the recipe card and drop all your thoughts in the comments. Seriously, I read every single one! Tag me on social media if you post photos of your layers—I love seeing how they turn out in different kitchens. Happy baking, and enjoy your slice of homemade candy heaven! Don’t forget to check out my official privacy policy for details on site usage.
PrintClassic Homemade Twix Cookie Bars
Make your own version of the popular candy bar with these layered cookie bars featuring a buttery shortbread base, a thick layer of gooey caramel, and a rich chocolate coating.
- Prep Time: 20 min
- Cook Time: 43 min
- Total Time: 63 min
- Yield: 24 servings
- Category: Dessert
- Method: Baking
- Cuisine: American
- Diet: Vegetarian
Ingredients
- 1 cup (2 sticks) unsalted butter, softened
- 1/2 cup granulated sugar
- 2 cups all-purpose flour
- 1/4 teaspoon salt
- 1 (14 ounce) can sweetened condensed milk
- 1/2 cup packed light brown sugar
- 1/2 cup (1 stick) unsalted butter
- 1 teaspoon vanilla extract
- 1 1/2 cups semi-sweet chocolate chips
- 1 tablespoon vegetable oil
Instructions
- Preheat your oven to 350°F (175°C). Line a 9×13 inch baking pan with parchment paper, leaving an overhang on the sides for easy removal.
- Prepare the shortbread base: In a large bowl, cream together the softened butter and granulated sugar until light and fluffy.
- Gradually add the flour and salt. Mix until just combined and a crumbly dough forms.
- Press the dough evenly into the bottom of the prepared baking pan. Bake for 15 to 18 minutes, or until the edges are lightly golden. Remove from the oven.
- Prepare the caramel layer: In a medium saucepan, combine the sweetened condensed milk, brown sugar, and butter.
- Cook over medium heat, stirring constantly, until the mixture boils. Reduce the heat to low and continue stirring for 5 minutes until the caramel thickens slightly. Do not overcook.
- Remove the caramel from the heat and stir in the vanilla extract.
- Pour the hot caramel evenly over the warm shortbread crust. Return the pan to the oven and bake for an additional 10 minutes.
- Let the bars cool completely at room temperature, about 1 hour, then chill in the refrigerator for at least 1 hour to set the caramel.
- Prepare the chocolate topping: Place the chocolate chips and vegetable oil in a microwave-safe bowl. Microwave in 30-second intervals, stirring well after each, until smooth and fully melted.
- Pour the melted chocolate over the chilled caramel layer. Spread quickly to cover the entire surface.
- Refrigerate the bars for at least 2 hours, or until the chocolate is firm.
- Use the parchment paper overhang to lift the slab out of the pan. Cut into bars or bite-sized pieces.
Notes
- For a thicker caramel layer, you can increase the caramel ingredients by 50% and adjust the cooking time slightly.
- If you prefer a softer chocolate coating, use milk chocolate instead of semi-sweet.
- Chill the bars thoroughly before cutting; this prevents the caramel from sticking to your knife.
Nutrition
- Serving Size: 1 bar
- Calories: 280
- Sugar: 25
- Sodium: 85
- Fat: 17
- Saturated Fat: 10
- Unsaturated Fat: 7
- Trans Fat: 0
- Carbohydrates: 30
- Fiber: 1
- Protein: 3
- Cholesterol: 35